In this Article:
Last Updated on 2023-10-23
How To DoorDash - Step By Step Guide For Beginners [With Screenshots]
We worked with these active, experienced gig-workers to write this article and bring you first-hand knowledge.

Experienced writer/researcher in the gig industry working alongside our gig-workers

5 years of experience as a DoorDash Dasher

7 years of experience working across DoorDash, Lyft, Amazon Flex, and Instacart

5 years of experience working across GrubHub, DoorDash, Shipt, and Uber Eats
The information provided in this post is for informational purposes only and should not be construed as legal, tax, or insurance advice. The content contains general information and may not reflect current legal developments or insurance changes. Any reader should consult with an insurance professional to obtain insurance advice tailored to their specific circumstances.
The first day at a new job is always a bit nerve wracking. But when you start working as a Dasher, there’s an extra layer: there’s no one there to train you, and even though you can reach out to Dasher support for help, there’s no one right there with you if you have a question.
Because of that, it’s a good idea to familiarize yourself with how dashing works before you start your first dash. That way, there will be fewer surprises, and you’ll feel more confident once you hit the road.
If you haven’t already, sign up for DoorDash now — it takes a few days to get approved, so get that sorted out so you can hit the ground running.
After that, make sure that you have everything you need to start working for DoorDash, like car insurance, health insurance, and a vehicle (car, bike, moped, motorcycle, or scooter).
Once your account is approved, you’re ready to set up your account, schedule your first shift, and start dashing.
Step 1: Download the Dasher app and get acquainted with it
Before you start dashing, you need to download the Dasher app. If you’re on Android, you can download it from the Play store. If you’re on iOS, you can download it from the App store.
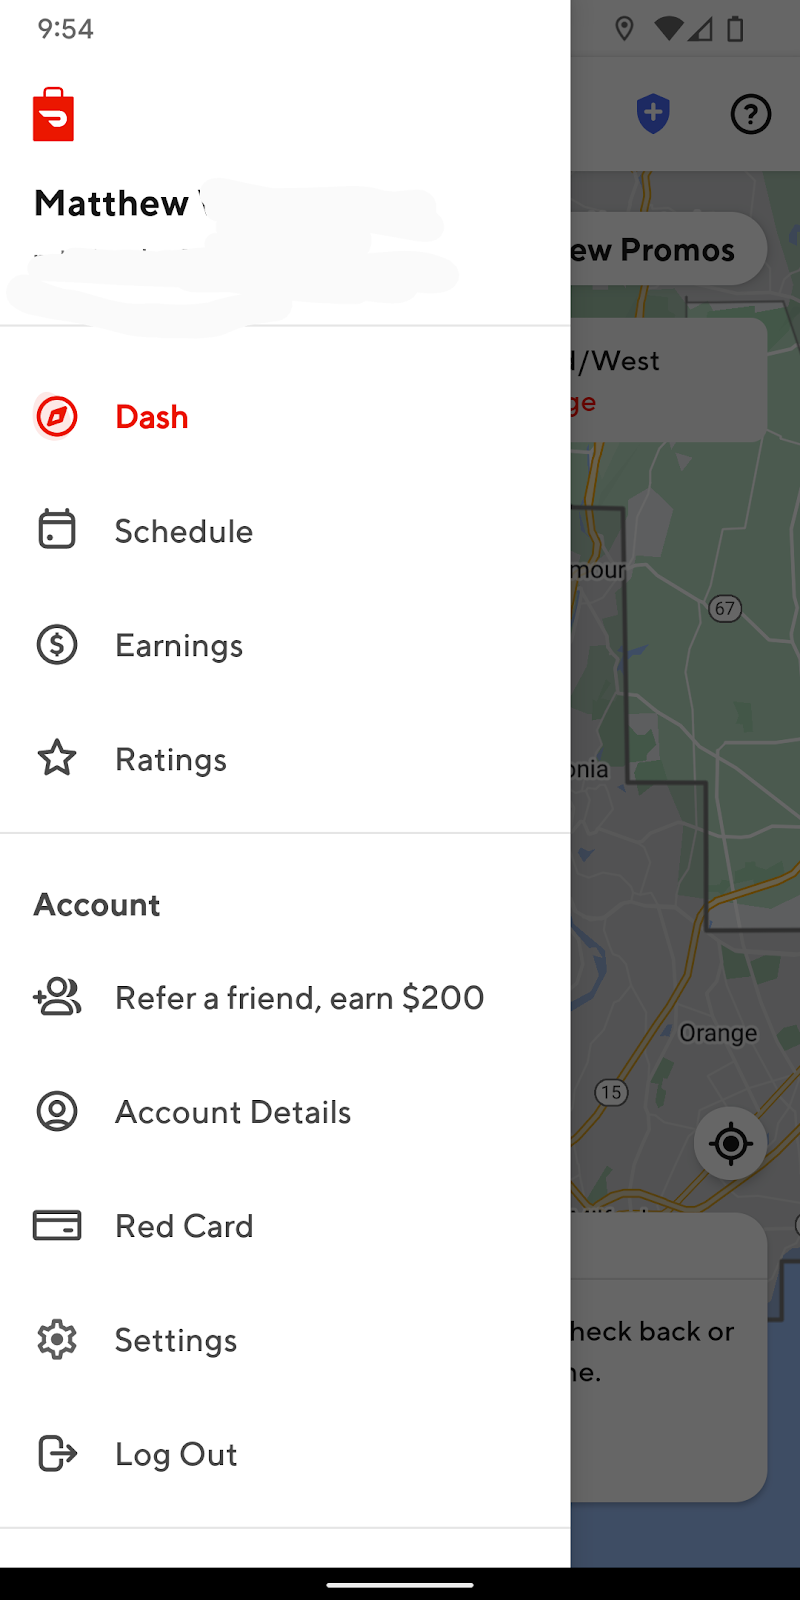
Once you’ve downloaded it, open it up. At the top right, you’ll see a hamburger button. If you press it, you’ll have access to these important screens:
- Dash: The main view that shows the map and any information relevant to your current Dash.

- Schedule: Gives you options to schedule a Dash in advance.
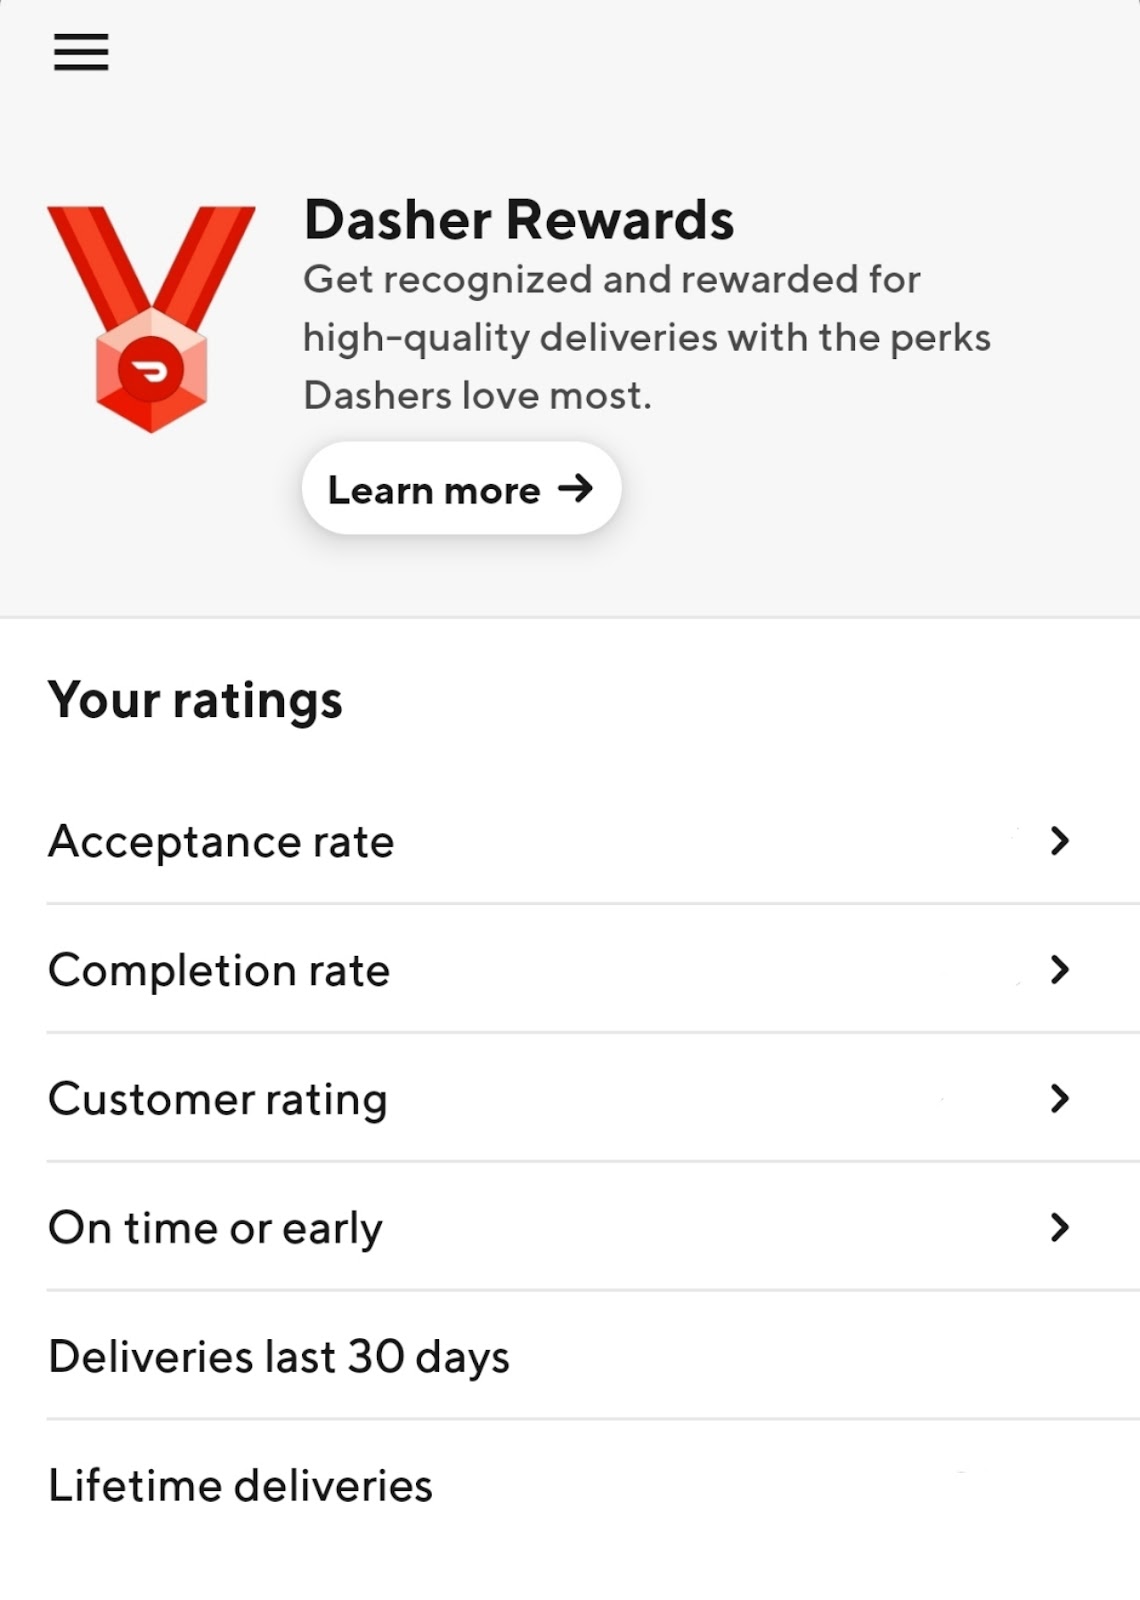
- Account: Displays your account information.

- Ratings: Shows you your current customer rating, acceptance rate, completion rate, and on-time/early rate.
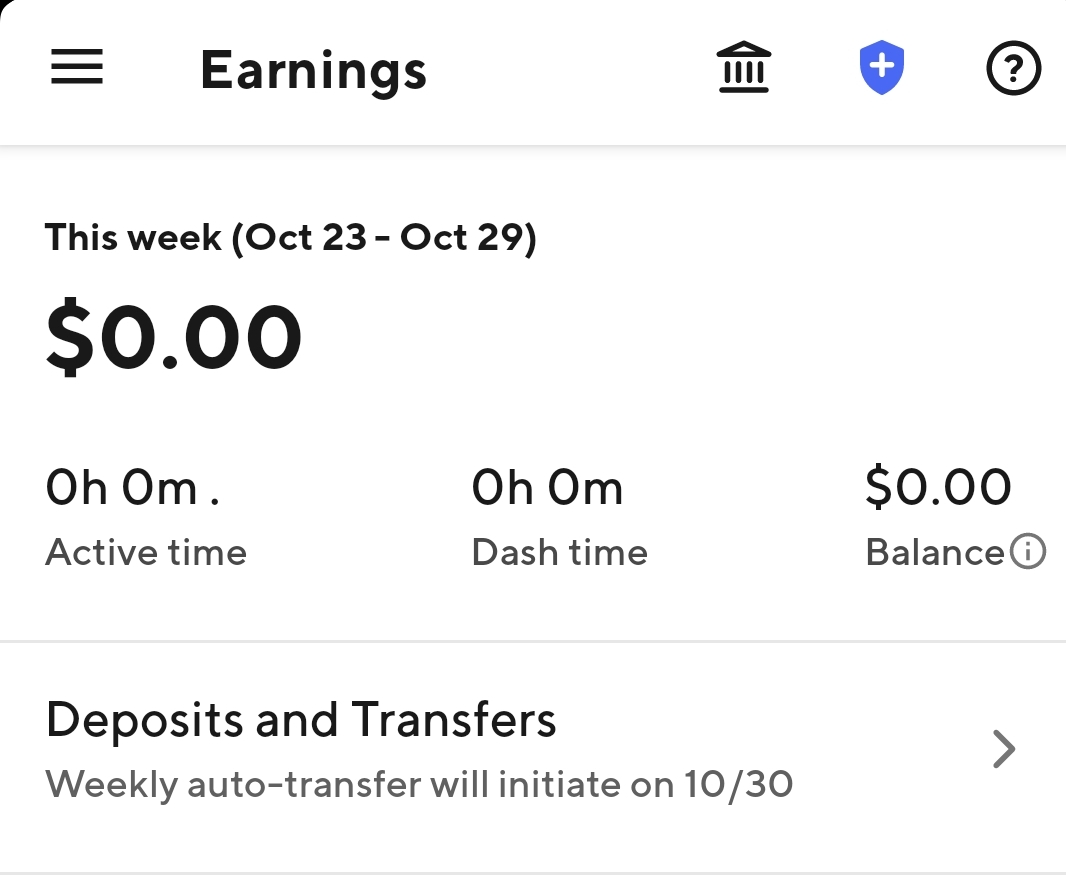
- Earnings: Displays your current earnings for the week.
On the top, you’ll see symbols that (from left to right) allow you to access your notifications, messages, available promotions, emergency assistance, and Dasher Support.
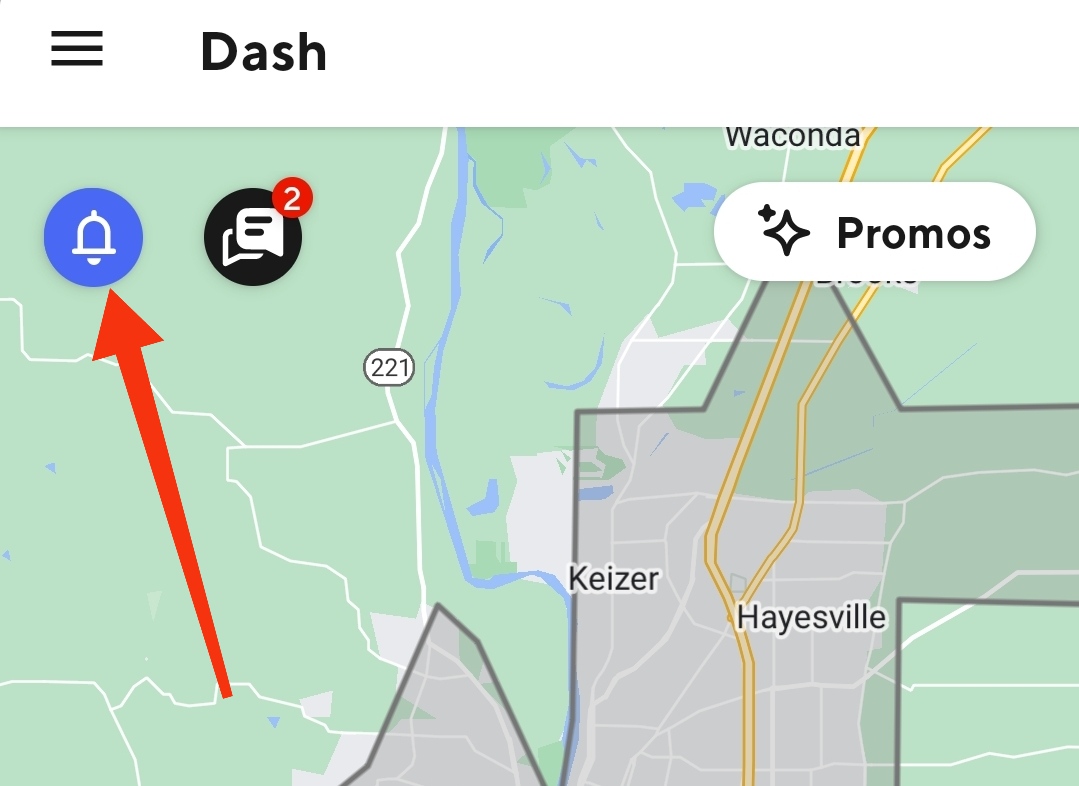
Notifications
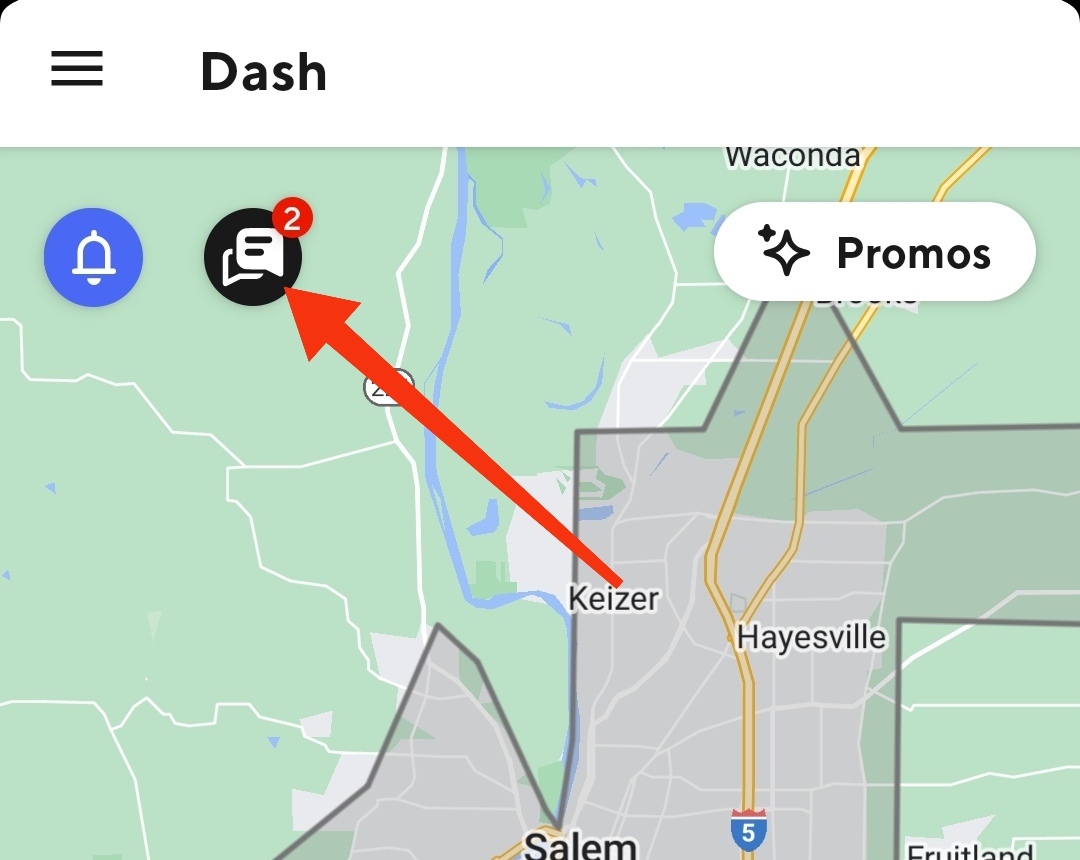
Messages

Promos

Emergency Assistance
Dasher Help
Most of these are pretty self explanatory, but three deserve a call out.
The promotion screen will show you a list of ongoing promos that will boost your earnings, so make sure you check those out before you start a dash.

If you ever find yourself in a sketchy situation, you can use the emergency screen (the blue shield) to get help. You’ll have the option of speaking with an ADT agent if you just want some reassurance or calling 911 and having the police sent immediately to your location.

Finally, the Dasher Help screen is there if you need help resolving any issues.

Step 2: Connect your bank account
To get paid by DoorDash, you’ll need to connect your bank account. To do so, make sure the app has access to your phone’s camera (you’ll need it to take a photo of your ID). You can enable this in the app settings and in your device settings.
Once you’ve enabled camera access, tap the “Earnings” tab on the bottom bar, then tap the red bank icon at the top right and select “Add Bank Account.” Follow the instructions to connect your account.
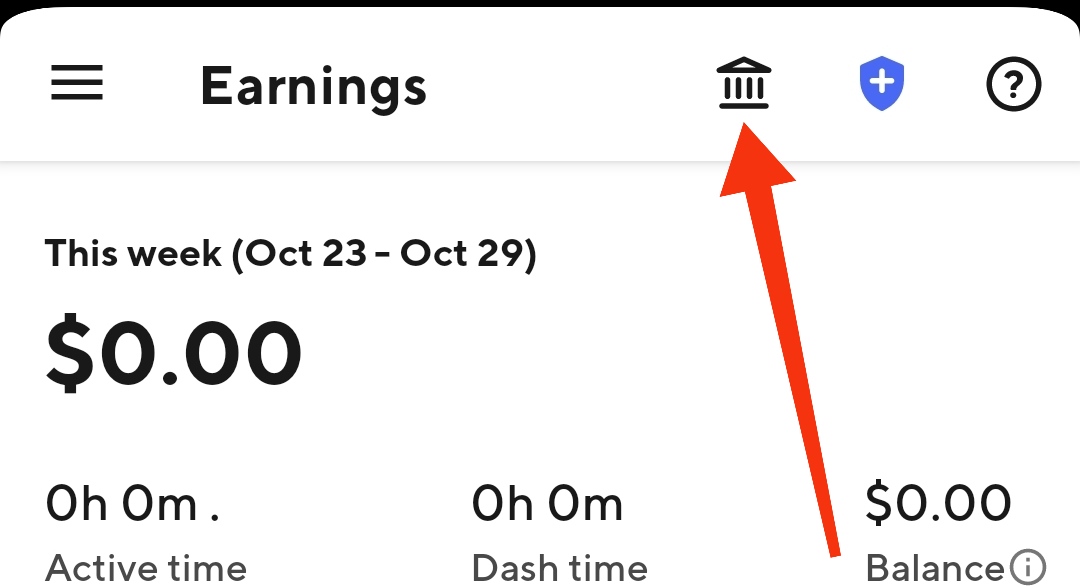
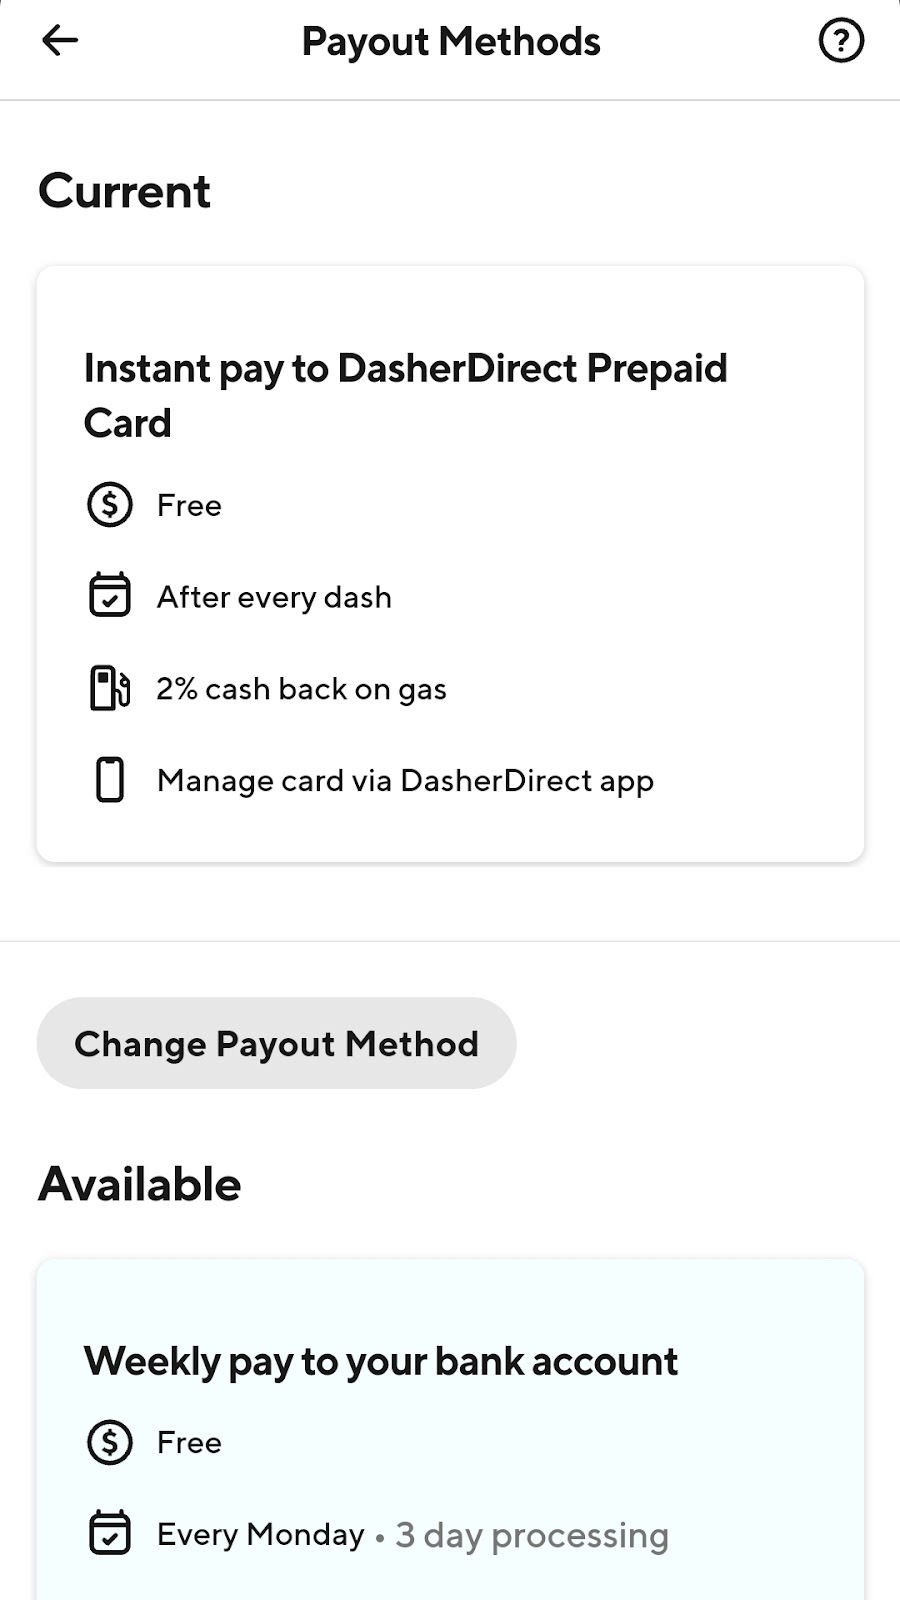
DoorDash pays weekly by direct deposit, so once your bank account is set up, your earnings will automatically show up in your bank account each week. You also have the option of using your DasherDirect debit card instead of your bank account, in which case you’ll get paid out immediately to your card after each dash.
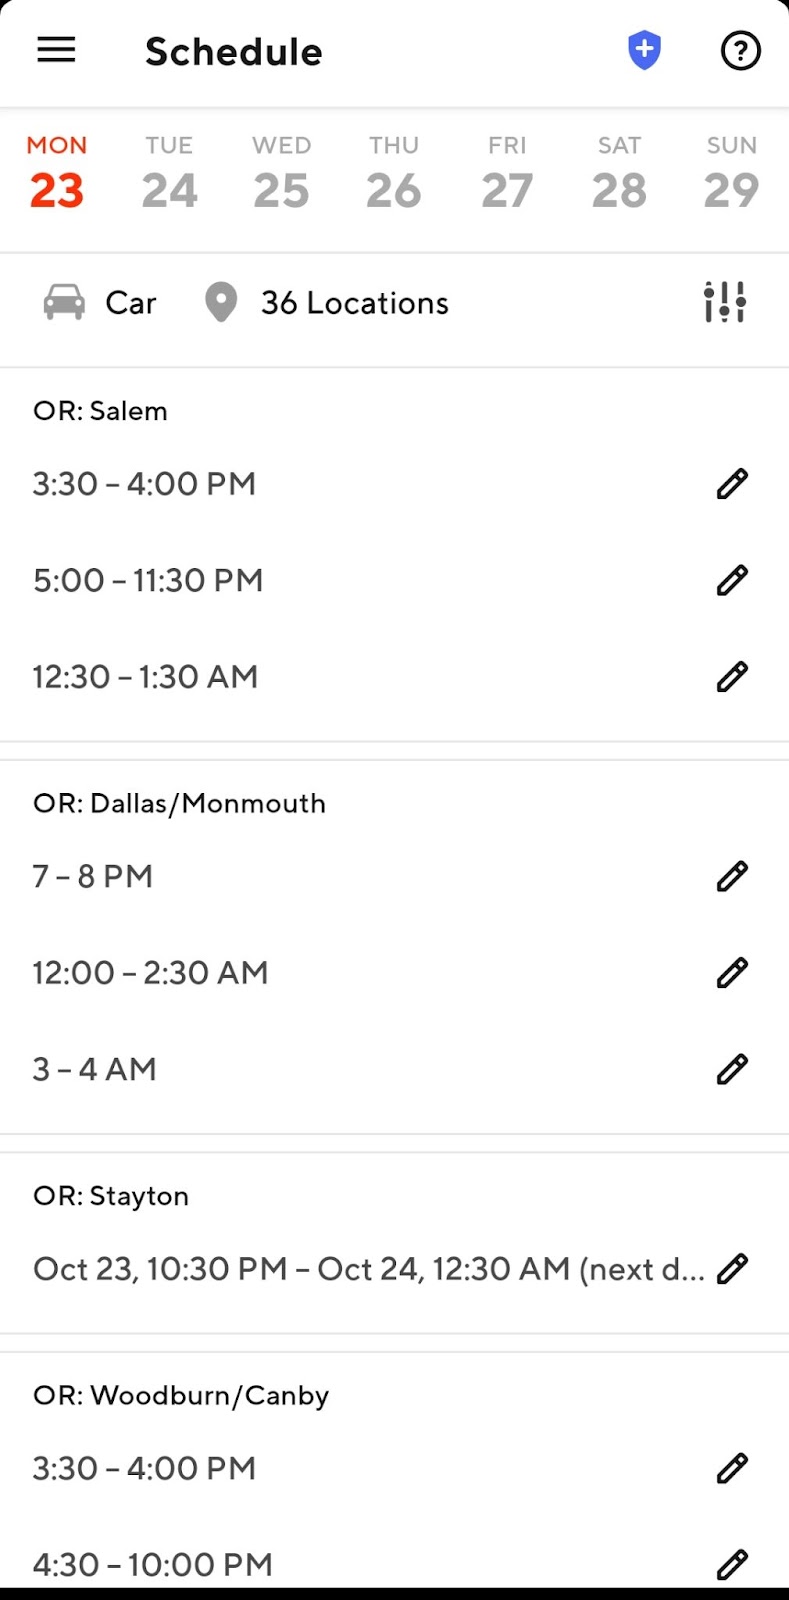
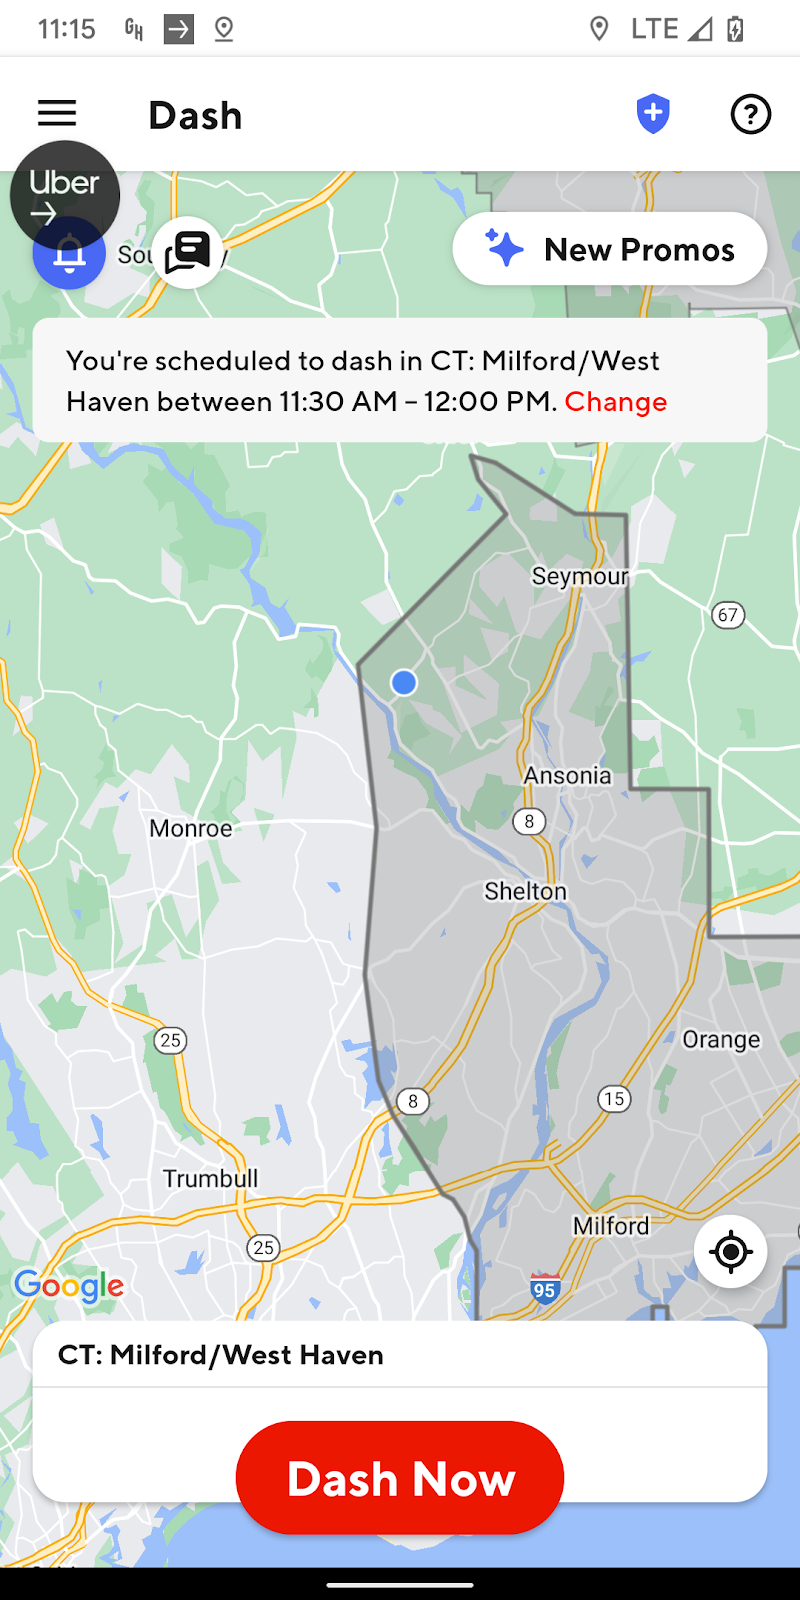
Step 3: Schedule a shift
One of the many benefits of being a self-employed Dasher is that you get to choose when you work (subject to local availability). When you want to start a Dash, you have two options:
- Dash Now
- Schedule a Dash
Dash Now lets you immediately start dashing, but it’s not always available. The “Dash Now” button appears at the bottom of the DoorDash app during peak hours, like lunch and dinner, or whenever demand is high enough to accommodate more Dashers. If you reach Top Dasher status, Dash Now will always be available for you (but that doesn’t mean that there will always be work).
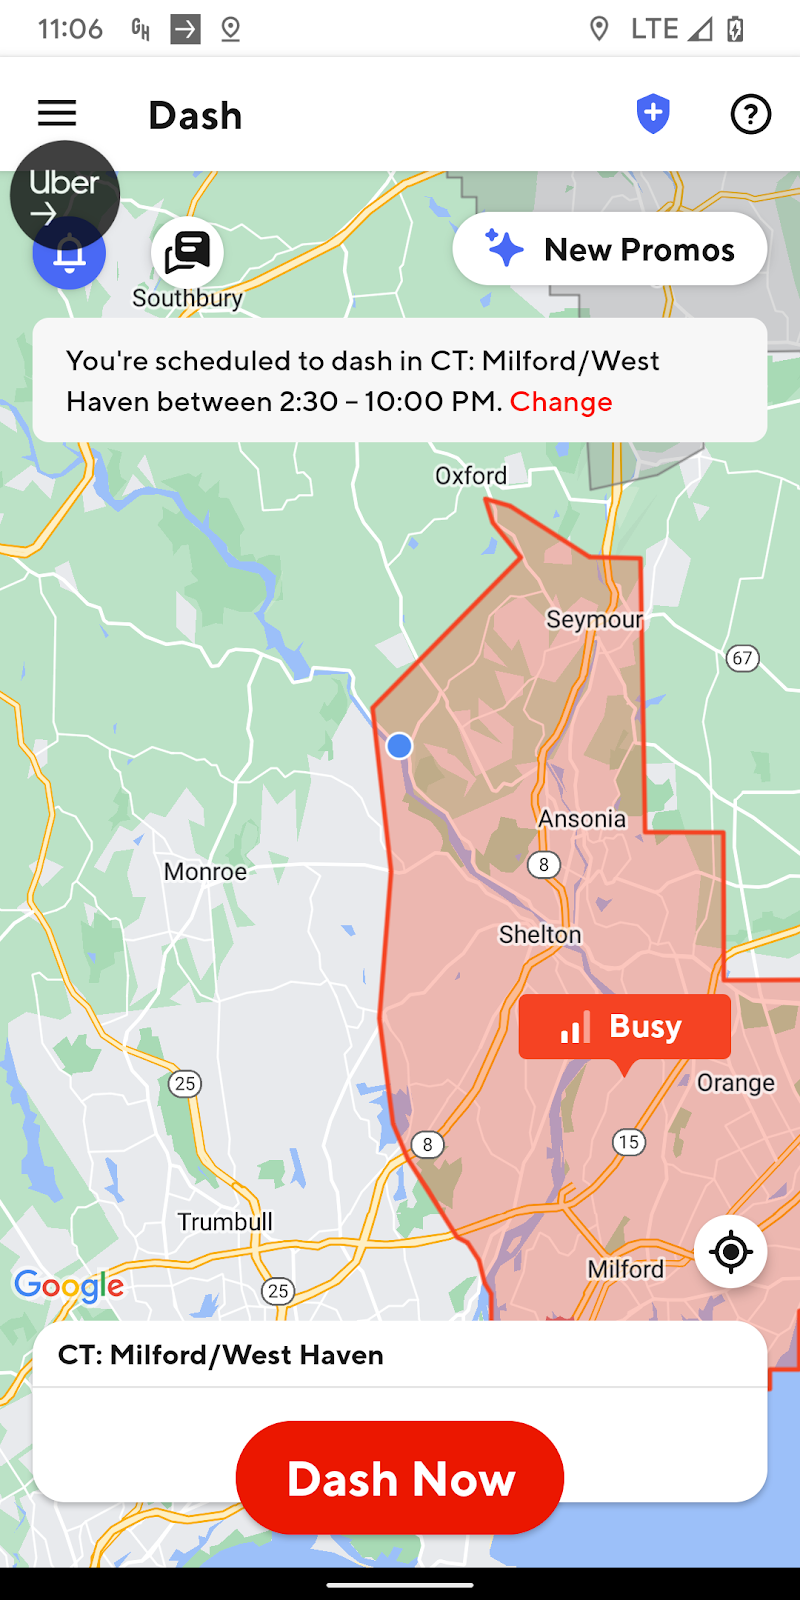
If Dash Now isn’t available, you’ll see “Schedule Dash” instead.
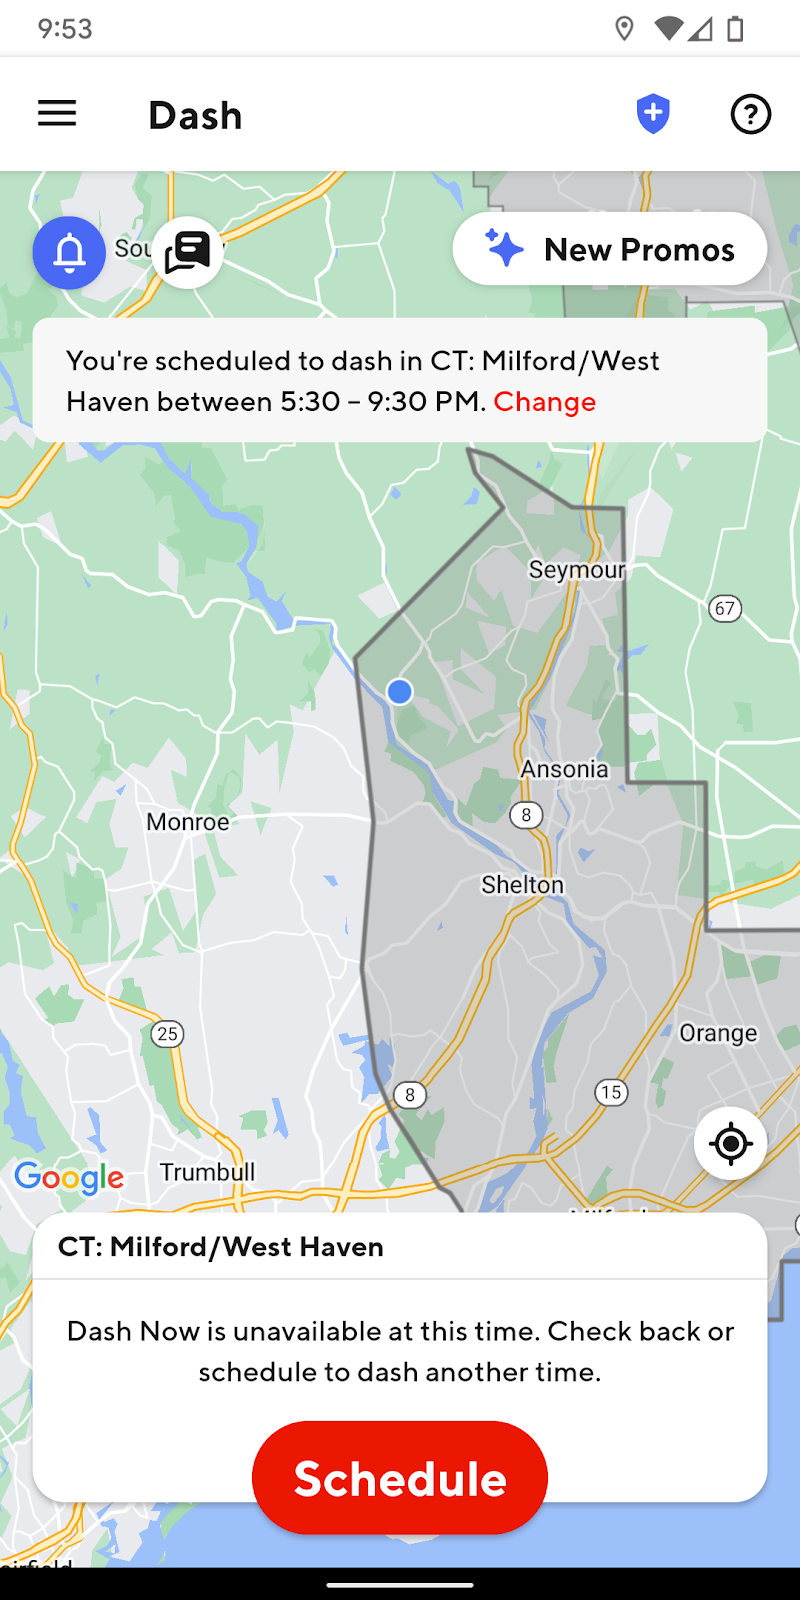
You can either schedule a dash by pressing the button at the bottom of the screen or selecting the “Schedule” tab.
Then, choose your preferred date, time, and starting point to schedule your Dash. If your preferred time isn’t listed, it means that there are already enough Dashers scheduled.
Matt Wheeler, who has been dashing since April 2021, says “if the hours you'd prefer aren't available, check back every seven minutes. The app updates availability every seven minutes. I was just able to change my shift for tonight from 5:30-9:30 to 2:30-10:00 after waiting seven minutes and checking back.”

Keep in mind that you can schedule yourself for longer than you intend to dash. If you decide to cut your shift short, there’s no penalty. For example, if you schedule yourself to dash from 6pm to 9pm, but then decide you’re too tired after the first hour, you can end the dash with no issues (assuming you’re not in the middle of a delivery).
Matt says that you can start your shift up to 15 minutes early, and you can be up to 29 minutes late for your shift without penalty. “After thirty minutes your shift will be lost so another driver can take your place. There is no penalty for being less than 30 minutes late.”
Step 4: Accept (or decline) your first order
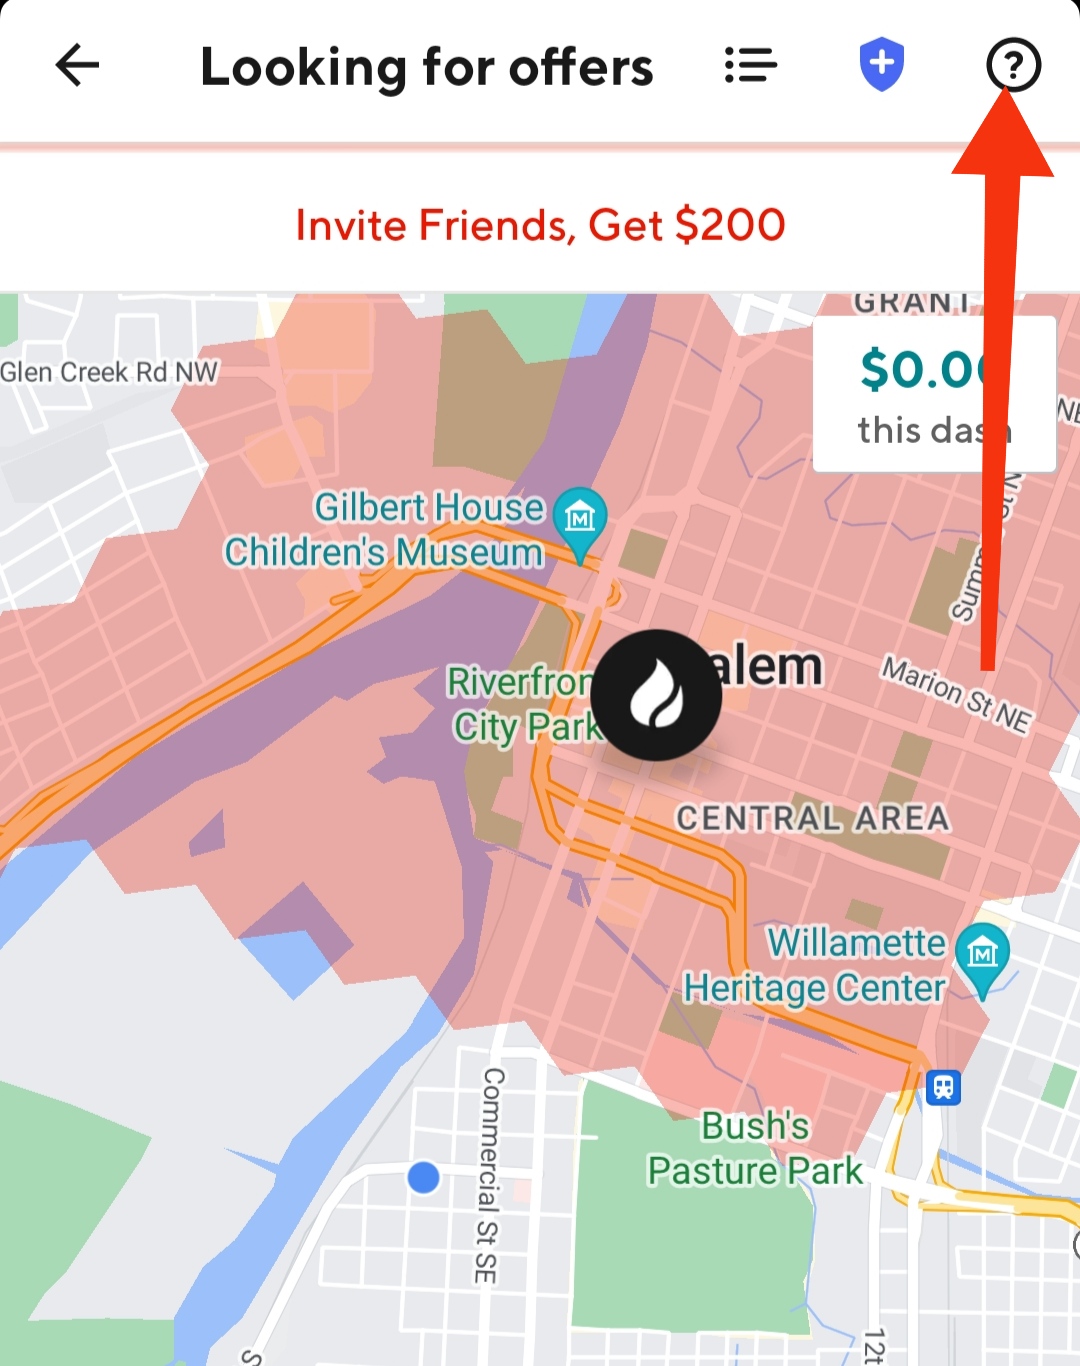
If you selected Dash Now, your Dash will start immediately. If you scheduled in advance, you’ll need to arrive at your starting point on time and then hit the Dash Now button.
Once you’ve done so, your screen will look like this:
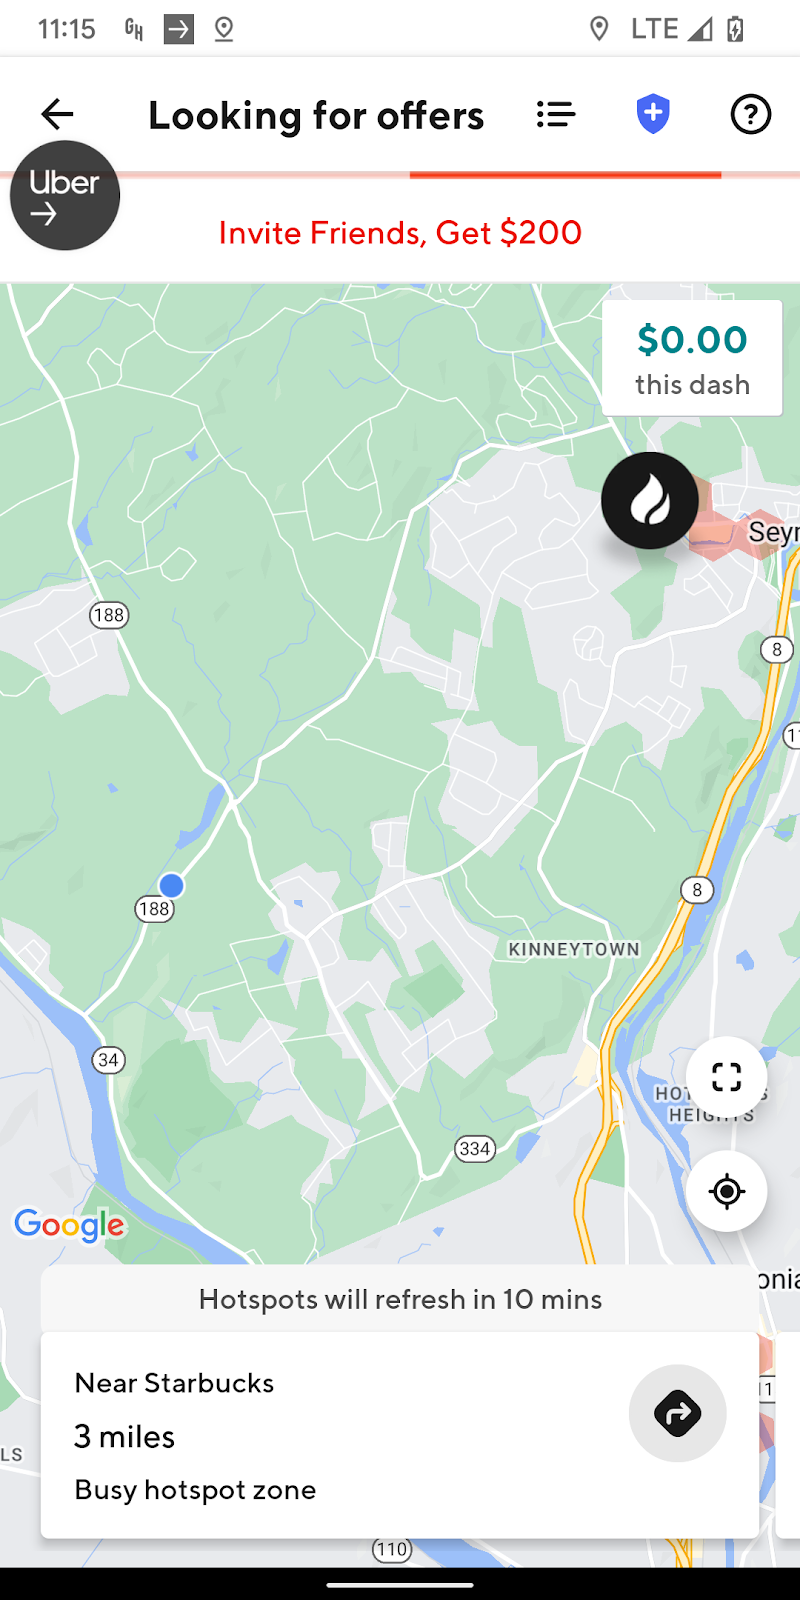
Unless business is abnormally slow, you’ll see orders start to pop up on your screen, like so:
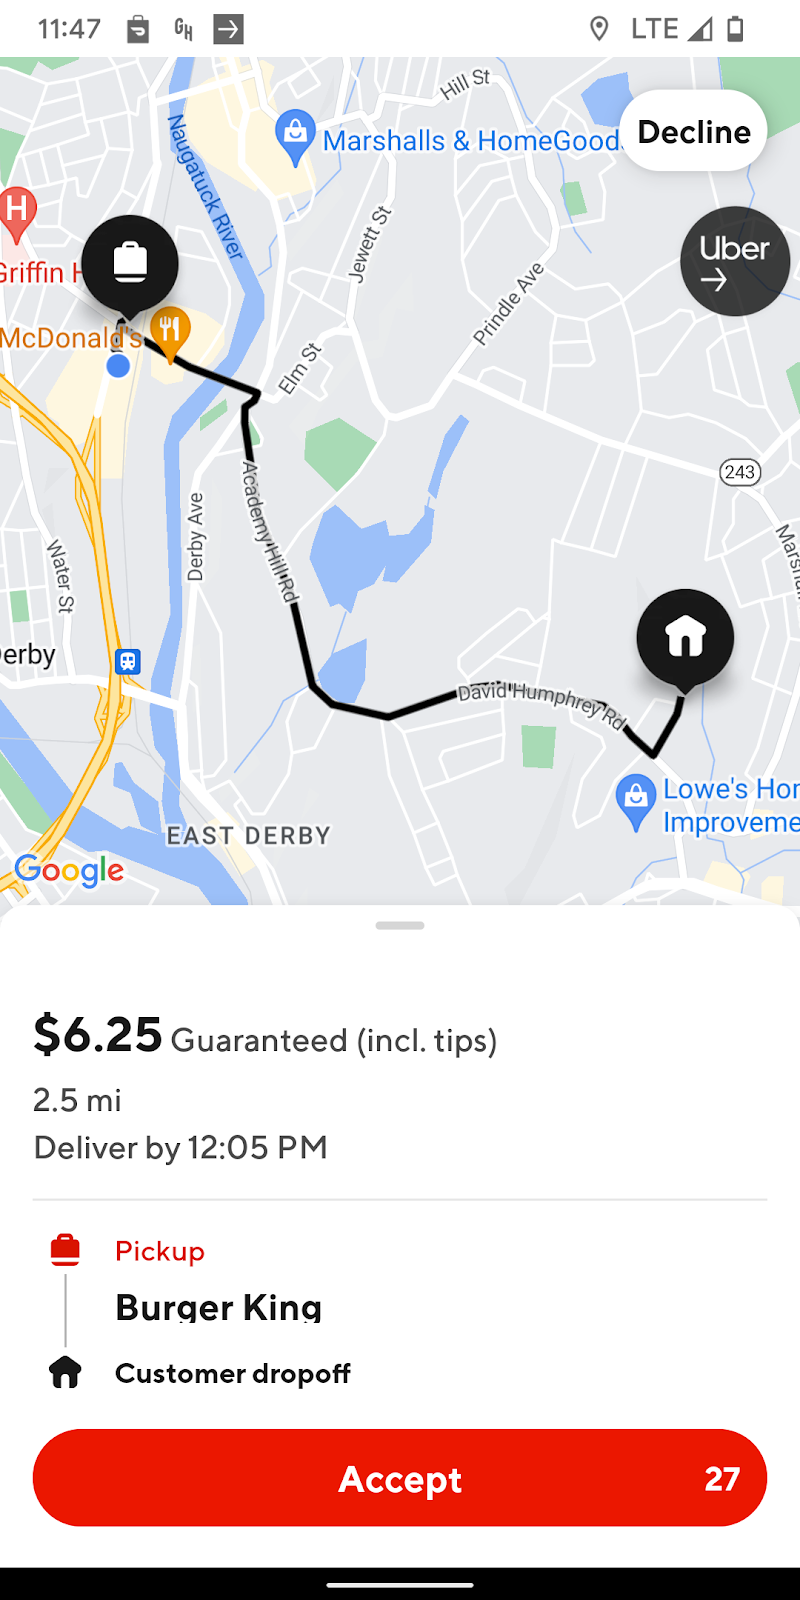
Each order will display the minimum amount that you are guaranteed to be paid, which includes base pay and part of the customer tip, the number of items to be delivered, the merchant you’ll pick up from, the number of miles you’ll have to drive, and the time you need to deliver by.
There are four different types of orders you can receive:
- Regular (food)
- Alcohol
- Tobacco
- Prescription
- Shop and pay
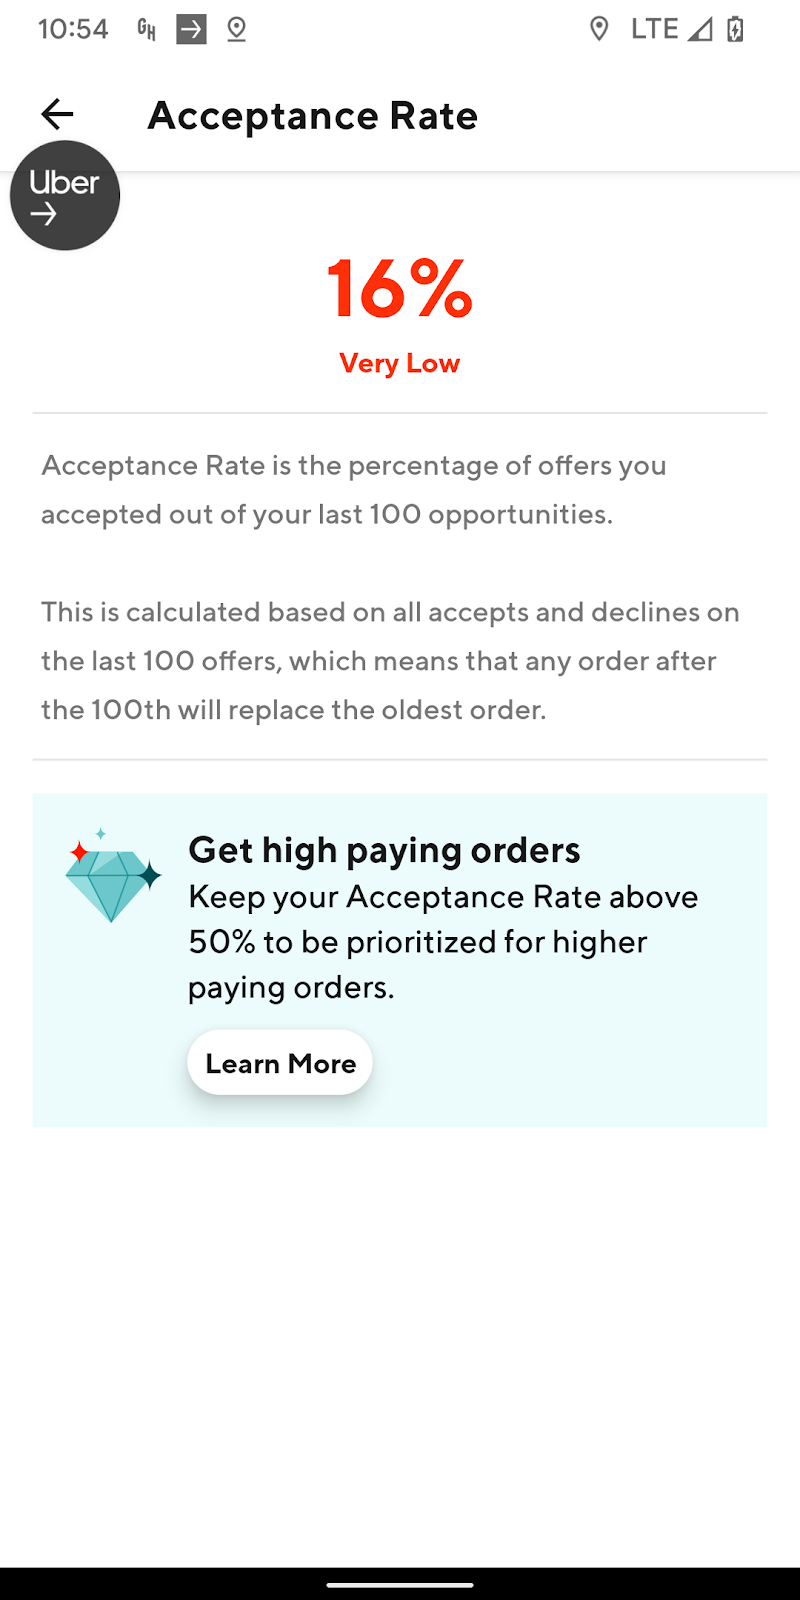
You have 40 seconds to accept or decline the order. It’s always your choice whether you accept an order or not — you don’t need to maintain a minimum acceptance rate to stay on the DoorDash app.
If you want to accept, tap the “Accept” button at the bottom of the screen. If you don’t want to complete the order, tap the “Decline” button in the top right corner. Accepting will begin the delivery, and declining will keep you on the current screen waiting for another order to come through.
Keep in mind that if you decline too many orders in a row, the app will pause your dash. Although this might sound scary, it doesn’t mean you’re in trouble or you’ve done anything wrong. All you have to do is press “Resume Dash,” and you’ll be on your way.
Developing a dashing strategy
As a Dasher, you’ll eventually want to develop a strategy that helps you decide which orders to accept and which to decline. For every order, it’s a good idea to factor in your expenses, like gas and wear and tear on your car, so that you get a more accurate idea of how much you’ll actually be making.
To figure this out, you should know your car’s MPG (miles per gallon) and the average cost of a gallon of gas around you.
For example, if an order requires you to drive 25 miles, your car’s miles per gallon is 25, and the order will pay you $5, it’s probably not worth taking: that order would cost you almost $4 in gas (based on current US average gas prices), meaning you’d only make $1 for all that time and effort. Probably not worth it.
Also, make sure to factor in whether the order will take you outside your Dashing zone. If you need to drive back before you can accept another order, that will slow you down and waste more gas.
Matt says that “a goal of $1.50 a mile is the basic general strategy recommended to new drivers.”
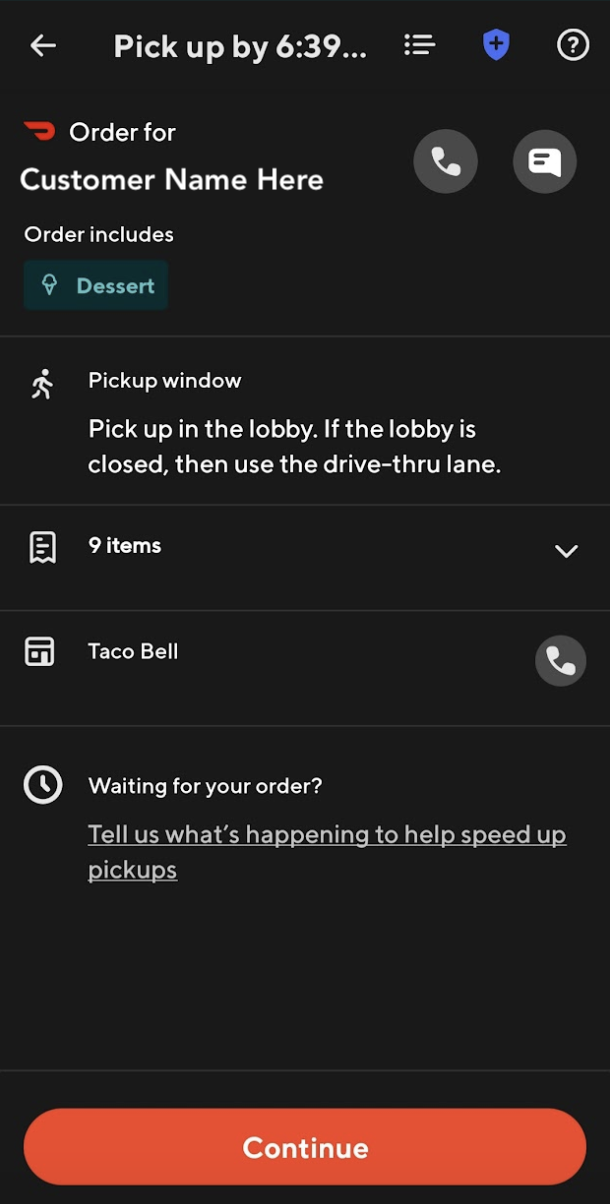
Step 5: Pick up the order
After you’ve accepted the order, the screen on your app will change to this:

Once you’ve accepted the order, you’ll still have the option of canceling it by going to the help screen and selecting “Can’t do this order.” However, this time, you can be penalized for ending the order — if your completion rate drops below 80%, your account may be deactivated.
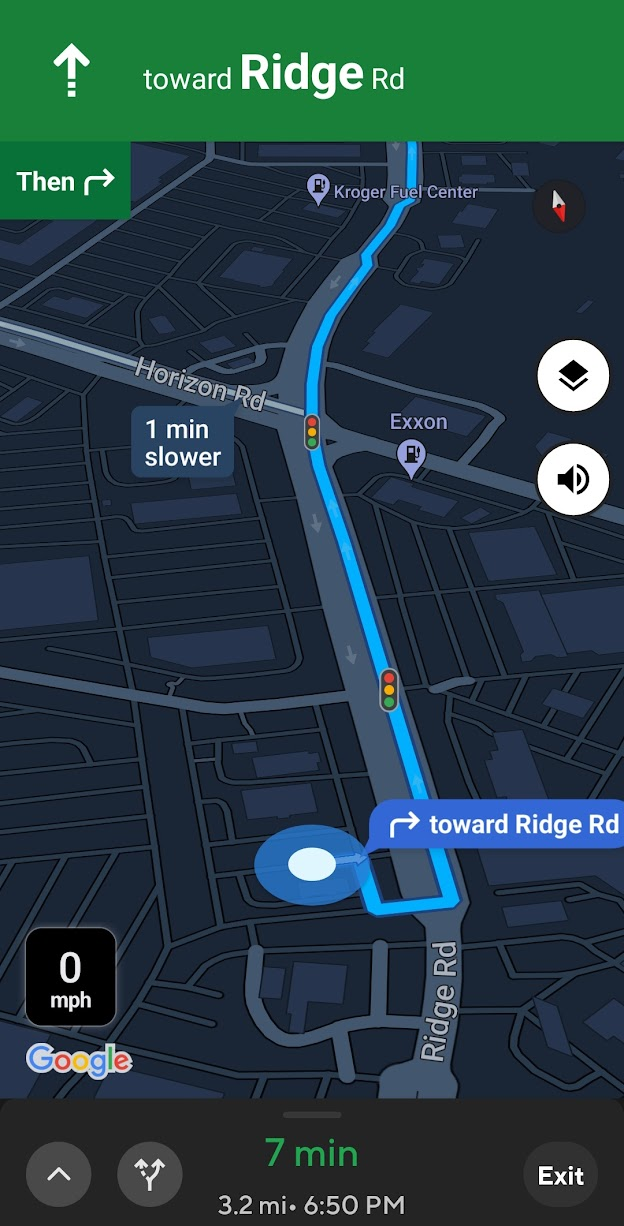
If you tap “Directions,” your default navigation app will open up and start directing you to the merchant.
From this point on, you can call or text your customer. Some Dashers like to make contact immediately and introduce themselves, while others prefer a more distant approach. There’s no right or wrong here — if you feel like you want to text your customer and let them know you’re going to go pick up their food, go for it. And if you don’t, that’s fine too.
Once you hit “Directions,” your navigation app will start giving you directions for how to arrive at the merchant. Simply follow the directions like you would any other directions in your GPS.
The merchant will already have your customer’s order and information, so all you need to do is walk in and tell them what customer you’re picking up for. The app may ask you to verify the items in the order with the merchant. Once you’ve done so, you can swipe the bottom of the screen to reroute to the customer.
Step 6: Deliver the order
At this point, many Dashers prefer to let their customer know that they’ve got their order, and they’re on their way. But once again, it’s not necessary — it’s totally up to your style.
Now that you’ve got the food in hand, simply follow the GPS directions until you arrive at your customer’s address. Then, follow the customer’s drop-off instructions.
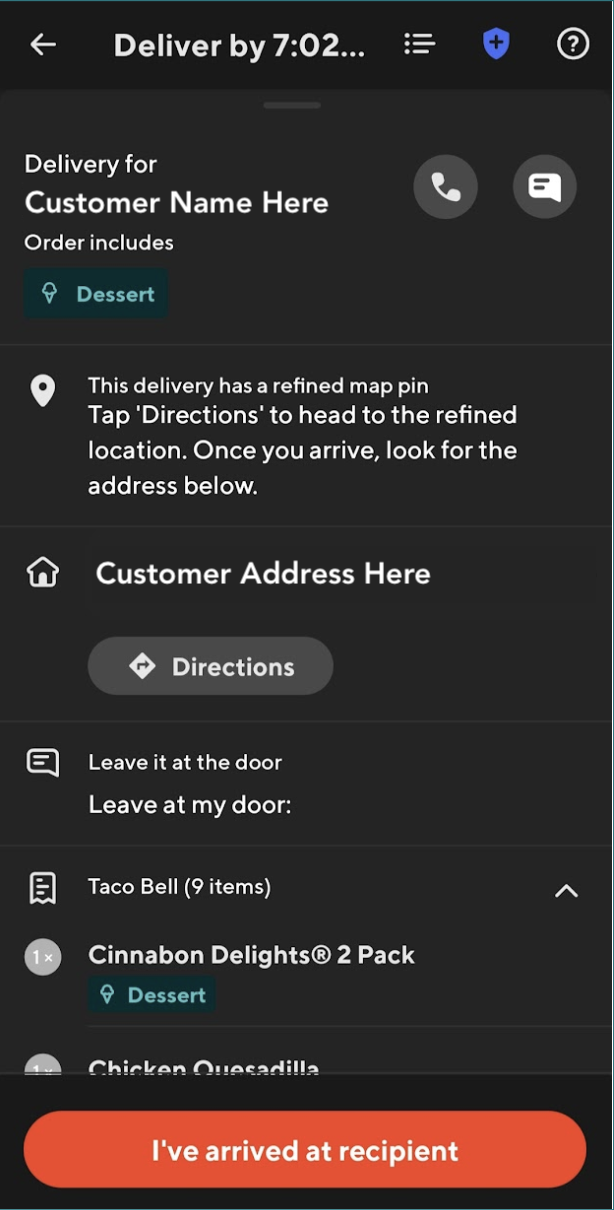
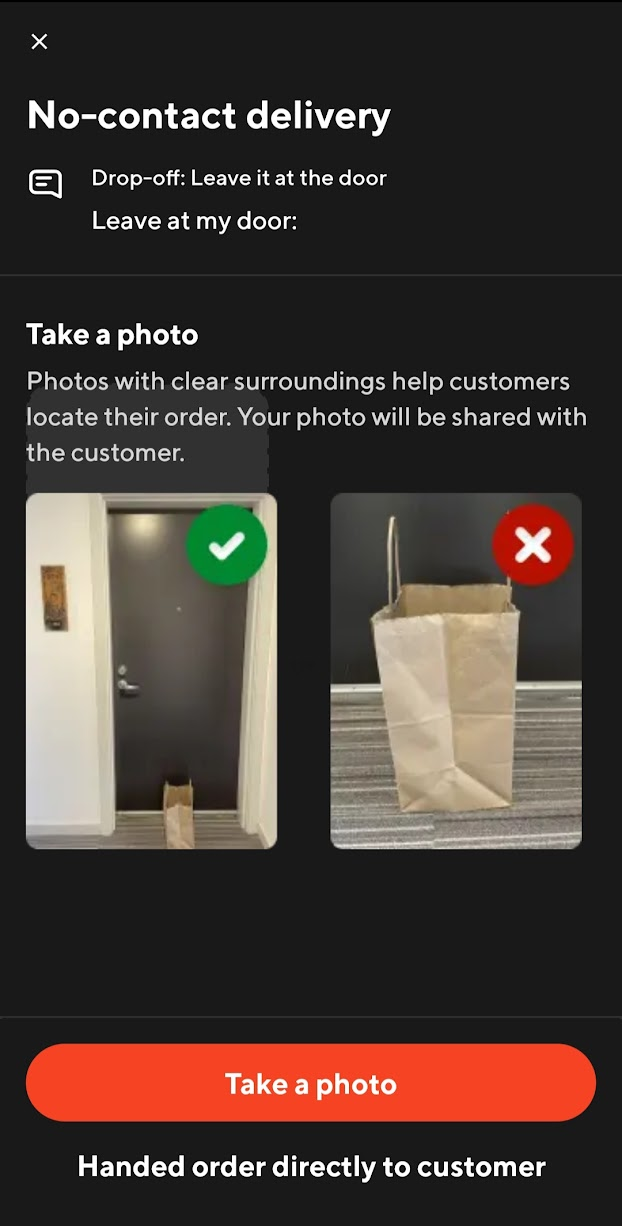
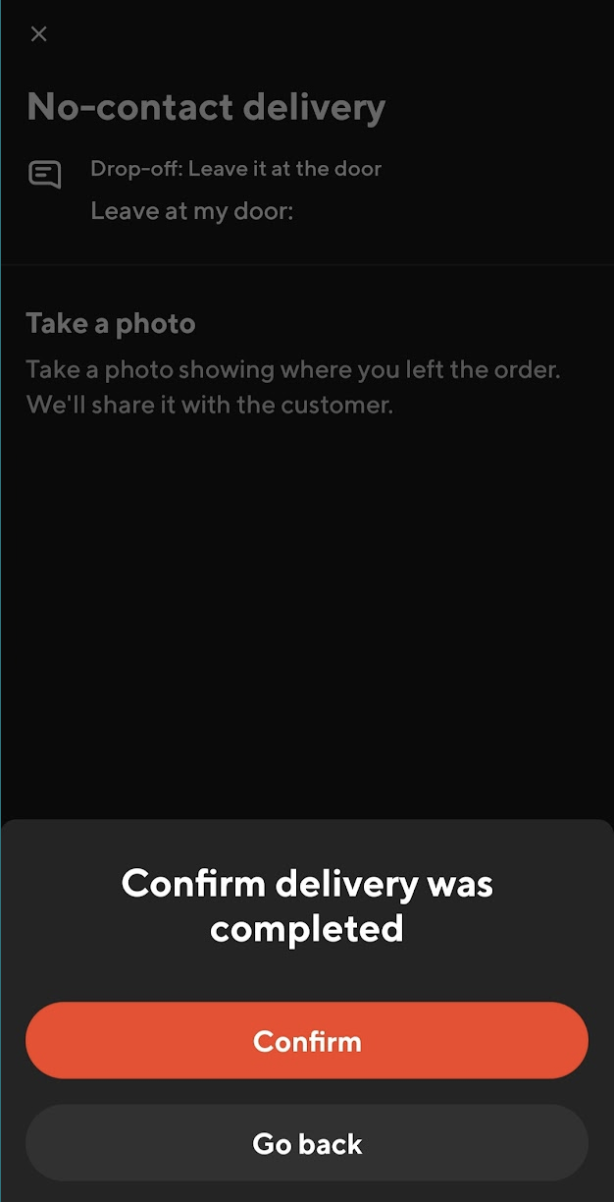
Some customers will opt for contactless delivery, in which case you’ll place the order in the specified location outside their home. DoorDash will then prompt you to take a photo of where you left it for verification.
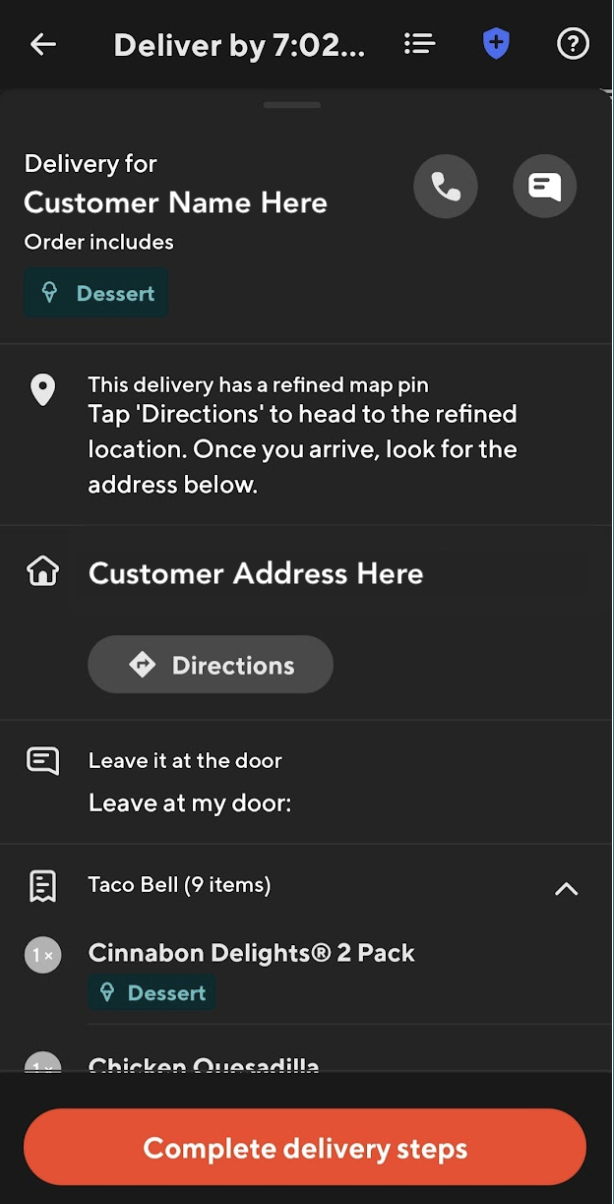
Sometimes, the customer will come out to get the food from you. When that happens, there is nothing you need to do.
When you’re done with the order, simply tap “Complete Delivery” to wrap things up. A short survey will be presented to you, in which you can give feedback on the delivery experience.

Step 7: Get paid
The money that you earned is instantly credited to your account, but you aren’t paid immediately. DoorDash pays out weekly via direct deposit, so you can relax and wait for the money to hit your bank account. If you’re using your DasherDirect debit card to receive payments, you’ll get paid as soon as you finish the dash.
Sometimes, you’ll also get a DoorDash coupon too.

If you want to get paid sooner, you can sign up for the DasherDirect debit card (pending approval to the program). With DasherDirect, you can get your earnings sent to your debit account immediately following each dash (which usually includes multiple deliveries).
And that’s it! Although it can seem intimidating, it’s easy to get started dashing. As you gain more experience, you’ll improve your customer service skills, develop your dashing strategy, and optimize your earnings.
Get started with DoorDash
Are you ready to start earning on your own time? Sign up now to become a Dasher — it takes just 5 minutes, and you can start earning within just days (pending Dasher approval and local availability).